I love to grow sweet potatoes! And they are fairly easy to grow once you have the right information. I can tell you once you’ve had the taste of fresh, homegrown, sweet potatoes…you’ll never want anything else.
I have a few tips that will help you grow sweet potatoes at home and have the best harvests ever!
Tip #1 – Grow Sweet Potatoes, Some Like it Hot
Unlike traditional tubers that prefer cool weather, your sweet potatoes like it HOT! This is a great summer crop. You’ll want to hold off planting them until you’ll past any springtime frost. Here in Phoenix, I can start putting mine out in late March or early April; but we get warm early here.
Tip #2 – Grow Sweet Potatoes, Slips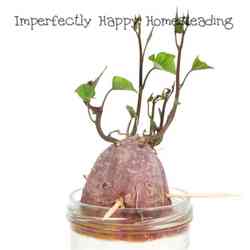
What is a sweet potato slip? A sweet potato slip is simply the green plant growth that sprouts from mature sweet potatoes, and are used for planting.
I’ll be honest, I didn’t grow sweet potato slips for years and still had wonderful hauls of potatoes at every harvest. But I got more when I took the time to grow slips or buy slips locally.
How To Grow Slips – to grow your slips you’ll need either sweet potato seeds or some organic sweet potatoes from the farmer’s market (grocery store potatoes are often treated so they will not sprout).
Each of your “seed potatoes” should grow 40 – 50 slips. You’ll want to wash your potatoes, then cut them in half. Take each half, and place the potato in water; you only want the bottom cut portion in the water. You can toothpicks to keep them from falling in the water. Keep them in a sunny, warm spot. It will take a couple of weeks for you to get good-sized slips.
Tip #3 – Grow Sweet Potatoes, Root Your Slips
Once you have grown your slips you’ll need to root them. Take your slips off your seed potatoes, careful not to break them. You’ll want to put them in a container where the ends (about 1/2 way up) are in water and leaves out. I usually use a quart-sized mason jar for this task. After just a few days you’ll see roots sprouting from the ends of each slip. Change the water every few days to keep the plants healthy.
Tip #4 – Grow Sweet Potatoes, Good Soil
For growing sweet potatoes, you’ll want a loamy soil (loose and able to drain well). Hard, clay filled soil will make it hard for your tubers to grow big! That is the best soil for good growth; but let me tell you, they’ll grow just about anywhere. The first year I grew sweet potatoes in my raised bed garden…I found jumpers all over the place. As long as you have the warmth, they’ll grow.
I like to prepare the soil with some fresh compost mixed in or use my soil mix.
Tip #5 – Grow Sweet Potatoes, Location
You’ll want to grow sweet potatoes in a warm sunny location in your garden. I use raised beds and fabric pots to grow my tubers. The fabric pots will keep your tubers from becoming root bound; especially bad for potatoes.
Tip #6 – Grow Sweet Potatoes, Planting
If you decide to skip slips you’ll plant your sweet potatoes much like traditional potatoes; adding soil as green plants show above. But for the best results, you’ll want to plant those slips!
If you’re planting slips then you’ll want to dig a hole about 4 inches deep and place the slip in so that it is covered about 1/2 way; leaving the upper 1/2 out. Be gentle with your slips, so they aren’t bruised or broken in the process.
You’ll want your slips to be about 12 inches apart and each row about 12 – 18 inches apart. But in a fabric container I haven’t paid that much mind and will do 2 or 3 slips in one 20 – 25 gallon container.
Give the soil a good soaking after you plant your slips.
Tip #7 – Grow Sweet Potatoes, Watering
For the first week or two I water the slips daily. The general rule is to water them twice a week for the first 4 weeks or so. Then you should be able to only water weekly; unless you live in a climate like mine where the soil dries out much faster. You do not want the soil to dry out so keep a watchful eye on it for the first few weeks to determine how often you’ll need to water.
You don’t want your soil to dry out but you don’t want your tubers to be water-logged either.
Tip #8 – Grow Sweet Potatoes, Fertilizer
Every 4 – 6 weeks I like to add a little worm castings to my beds or containers.
Tip #9 – Grow Sweet Potatoes, Harvesting
Your sweet potatoes should be ready to harvest at the end of summer or early in the fall, before any frost or freeze. You’ll notice that the foliage will begin to turn yellow and you can start harvesting then. But you can leave your tubers in the ground longer which will produce sweeter flesh and bigger potatoes. You’ll want all of them out before you get a freeze though – if the vines turn black you could be pulling out rotten potatoes.
There are many methods to getting your potatoes out of the ground. You can use a digging fork or your hands, like I do. But they biggest thing to remember is go slow and be careful; you don’t want to damage your tubers which will make storing them long-term impossible.
Don’t wash them! Just brush off the dirt and let them dry out in the sun for a few hours. Then you can bring them in for curing. Curing will not only help you keep your harvest longer, it sweetens them as well.
Tip #10 – Grow Sweet Potatoes, Curing and Storing
You’ll want to cure your sweet potatoes in a warm area with some humidity (a challenge in my desert climate). Lay them out in a single layer with butcher paper or newspaper under them. Leave them to rest for about 10 days. After they’ve cured you can store them in a cellar, fridge or closet where they will be kept cool but not freeze.
Now you’re ready to bake those babies up…you may not even need toppings!